
What Cloudflare Actually Does
Before touching a single DNS record, it helps to understand what you're signing up for. Cloudflare is not just a DNS registrar — it's a global network that sits between your visitors and your origin server, providing three major layers of value.
CDN (Content Delivery Network): Cloudflare operates data centers in over 300 cities worldwide. When a visitor requests your site, the response is served from the nearest Cloudflare location, reducing latency significantly compared to serving everything from a single origin. DDoS Protection: Cloudflare automatically absorbs volumetric attacks at the network edge. Even on the free plan, you get protection against large-scale distributed denial-of-service attacks that would take down an unprotected server. Free SSL/TLS: Every domain behind Cloudflare gets a free SSL certificate issued automatically. Visitors see the padlock; your origin server gets HTTPS without you paying a certificate authority. (There are nuances here — covered in the SSL section below.)All of this is available on Cloudflare's free plan, which is why it's become a default infrastructure choice for teams at every scale.
Proxy Mode vs DNS-Only: The Orange Cloud Explained
This is the concept most beginners miss, and it determines whether you're actually using Cloudflare's network or just its DNS.
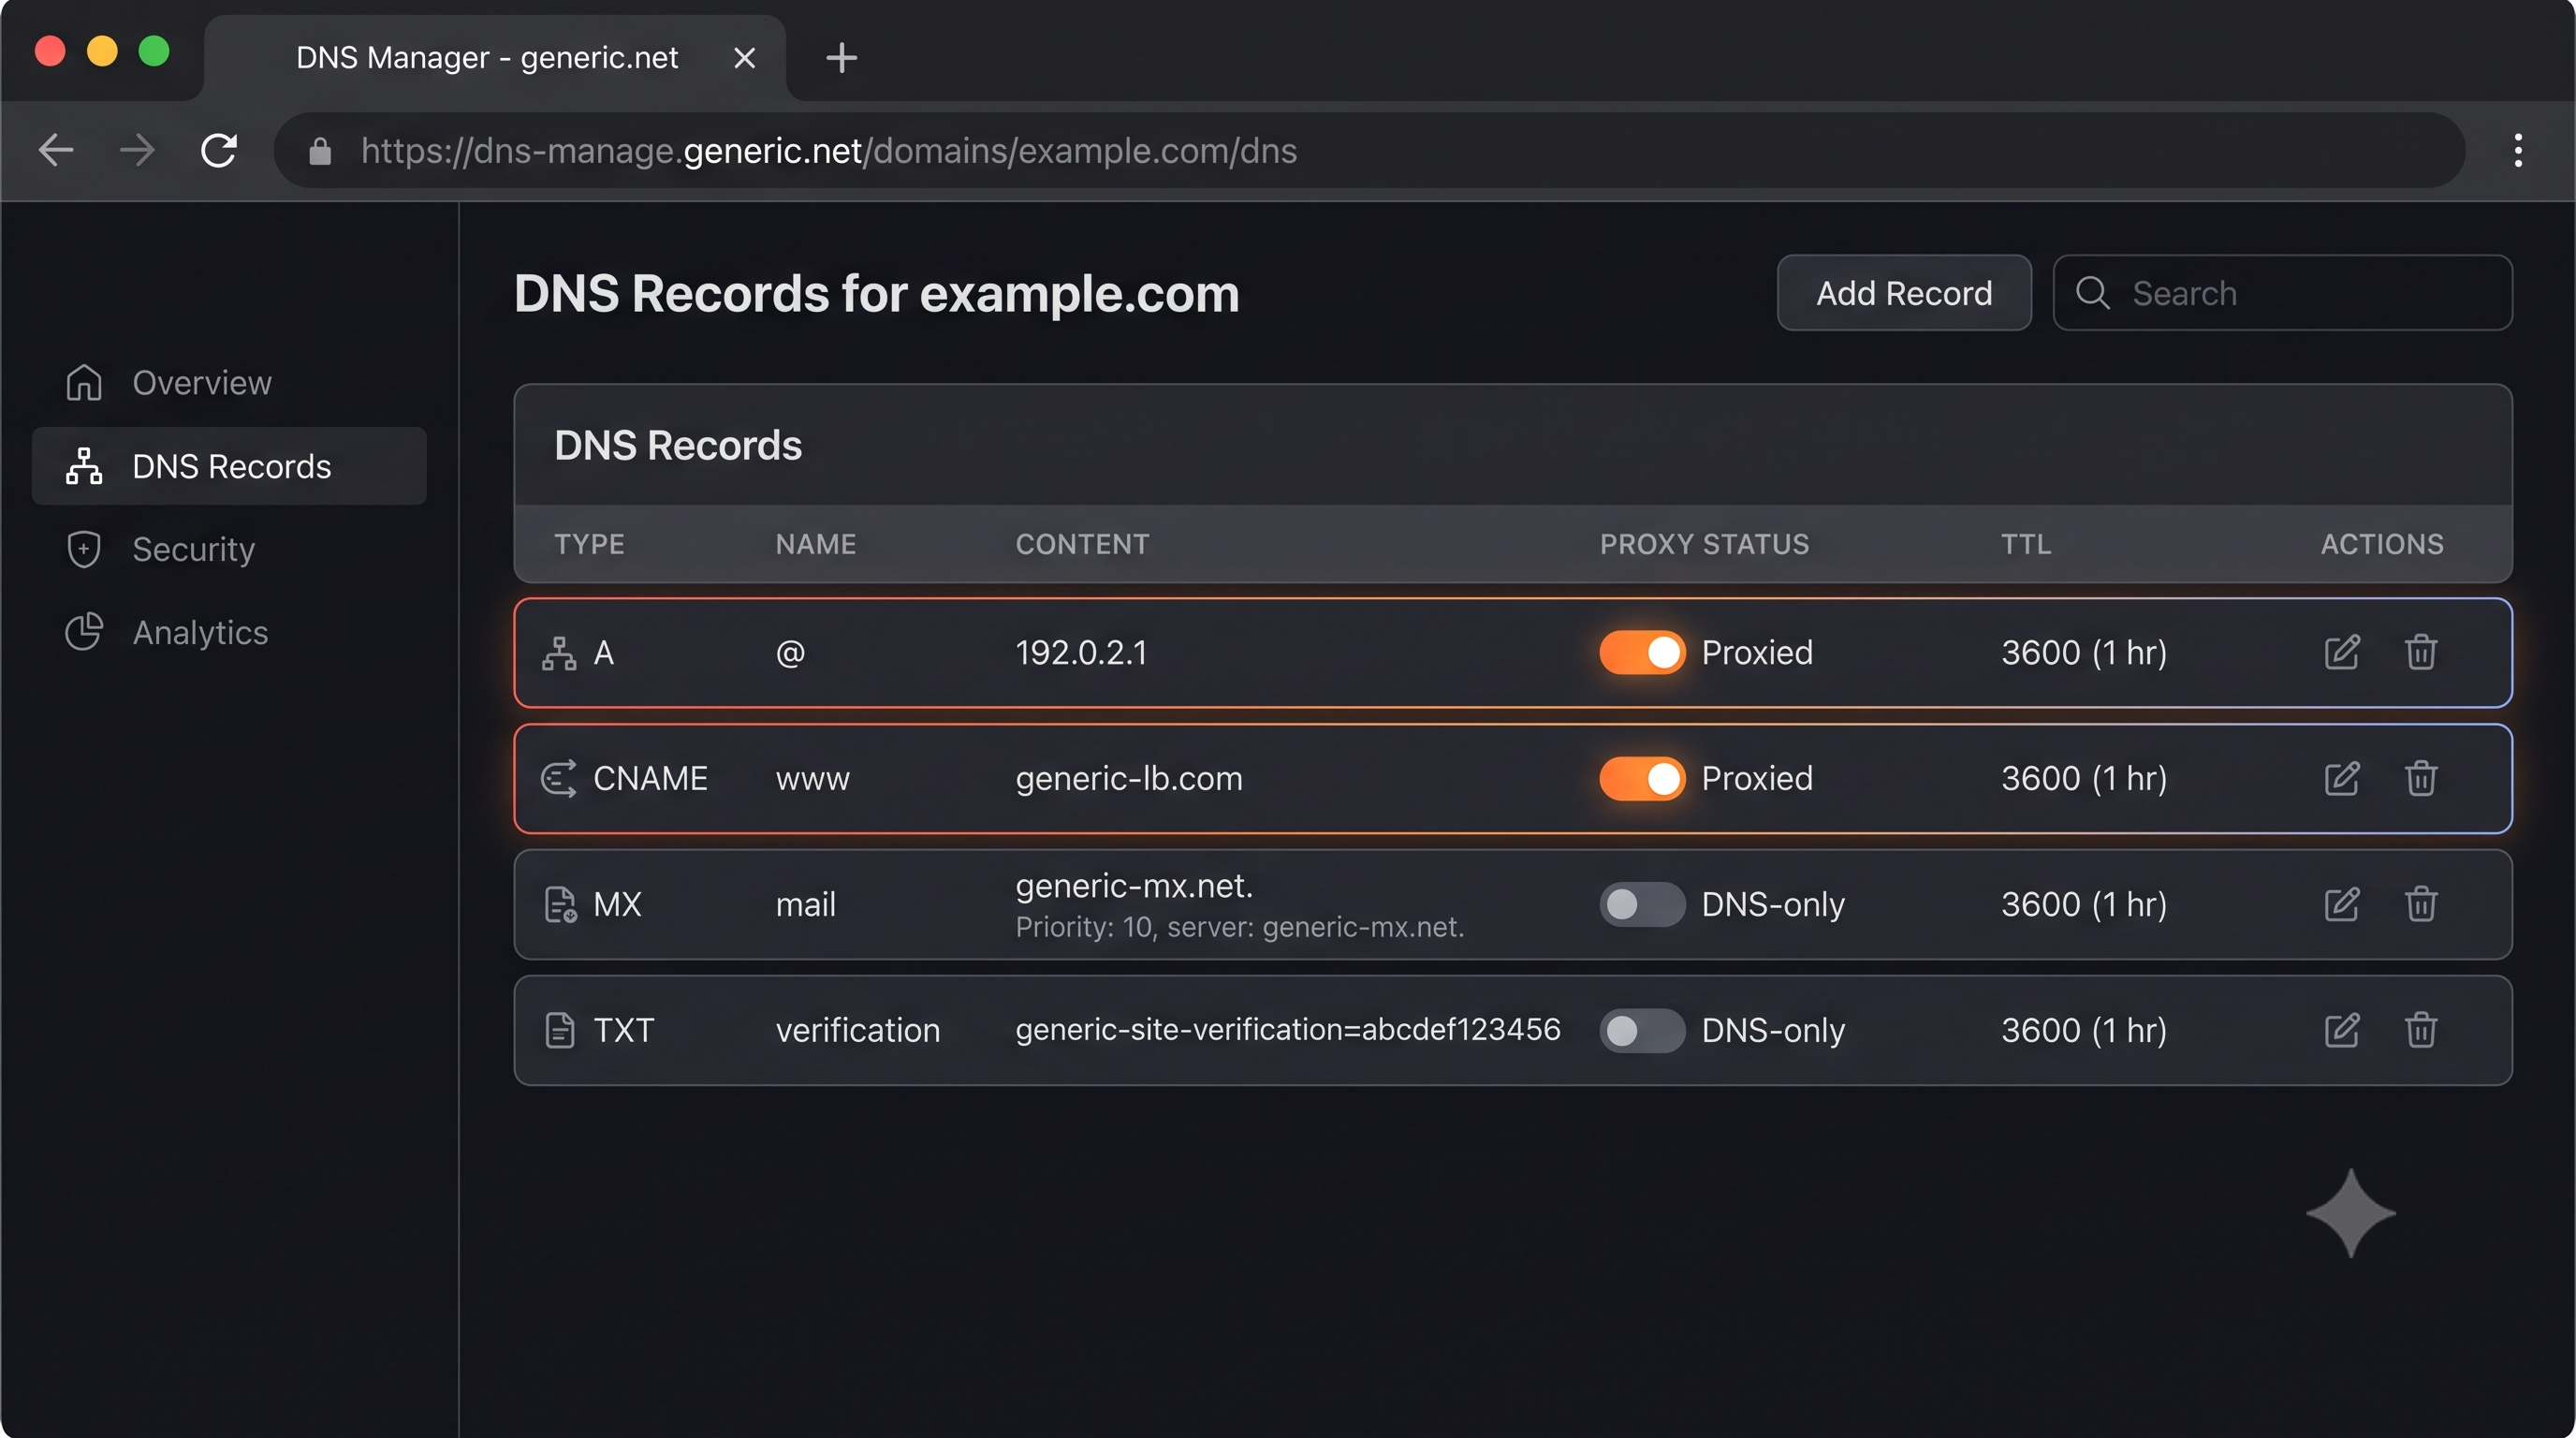
When you set a DNS record in Cloudflare, each record has a proxy status toggle:
- Orange cloud (Proxied): Traffic routes through Cloudflare's network. Cloudflare terminates the connection, applies your security and performance settings, then forwards clean requests to your origin. Your real server IP is hidden.
- Grey cloud (DNS Only): Cloudflare acts as a regular DNS resolver. It returns your actual origin IP in DNS queries. No CDN, no DDoS protection, no SSL from Cloudflare.
For most web traffic (A records, CNAME records for your site), you want the orange cloud. For records that should bypass Cloudflare — like MX records for email, or certain third-party verification records — you leave them grey.
The orange/grey distinction is the most common source of confusion for new Cloudflare users. If your security or performance settings aren't applying, the first thing to check is whether the relevant record is actually proxied.
Step 1: Create a Cloudflare Account and Add Your Site
Create the Account
Go to cloudflare.com and sign up for a free account. The free plan covers everything you need to get started, including the CDN, DDoS protection, SSL, and basic security rules.
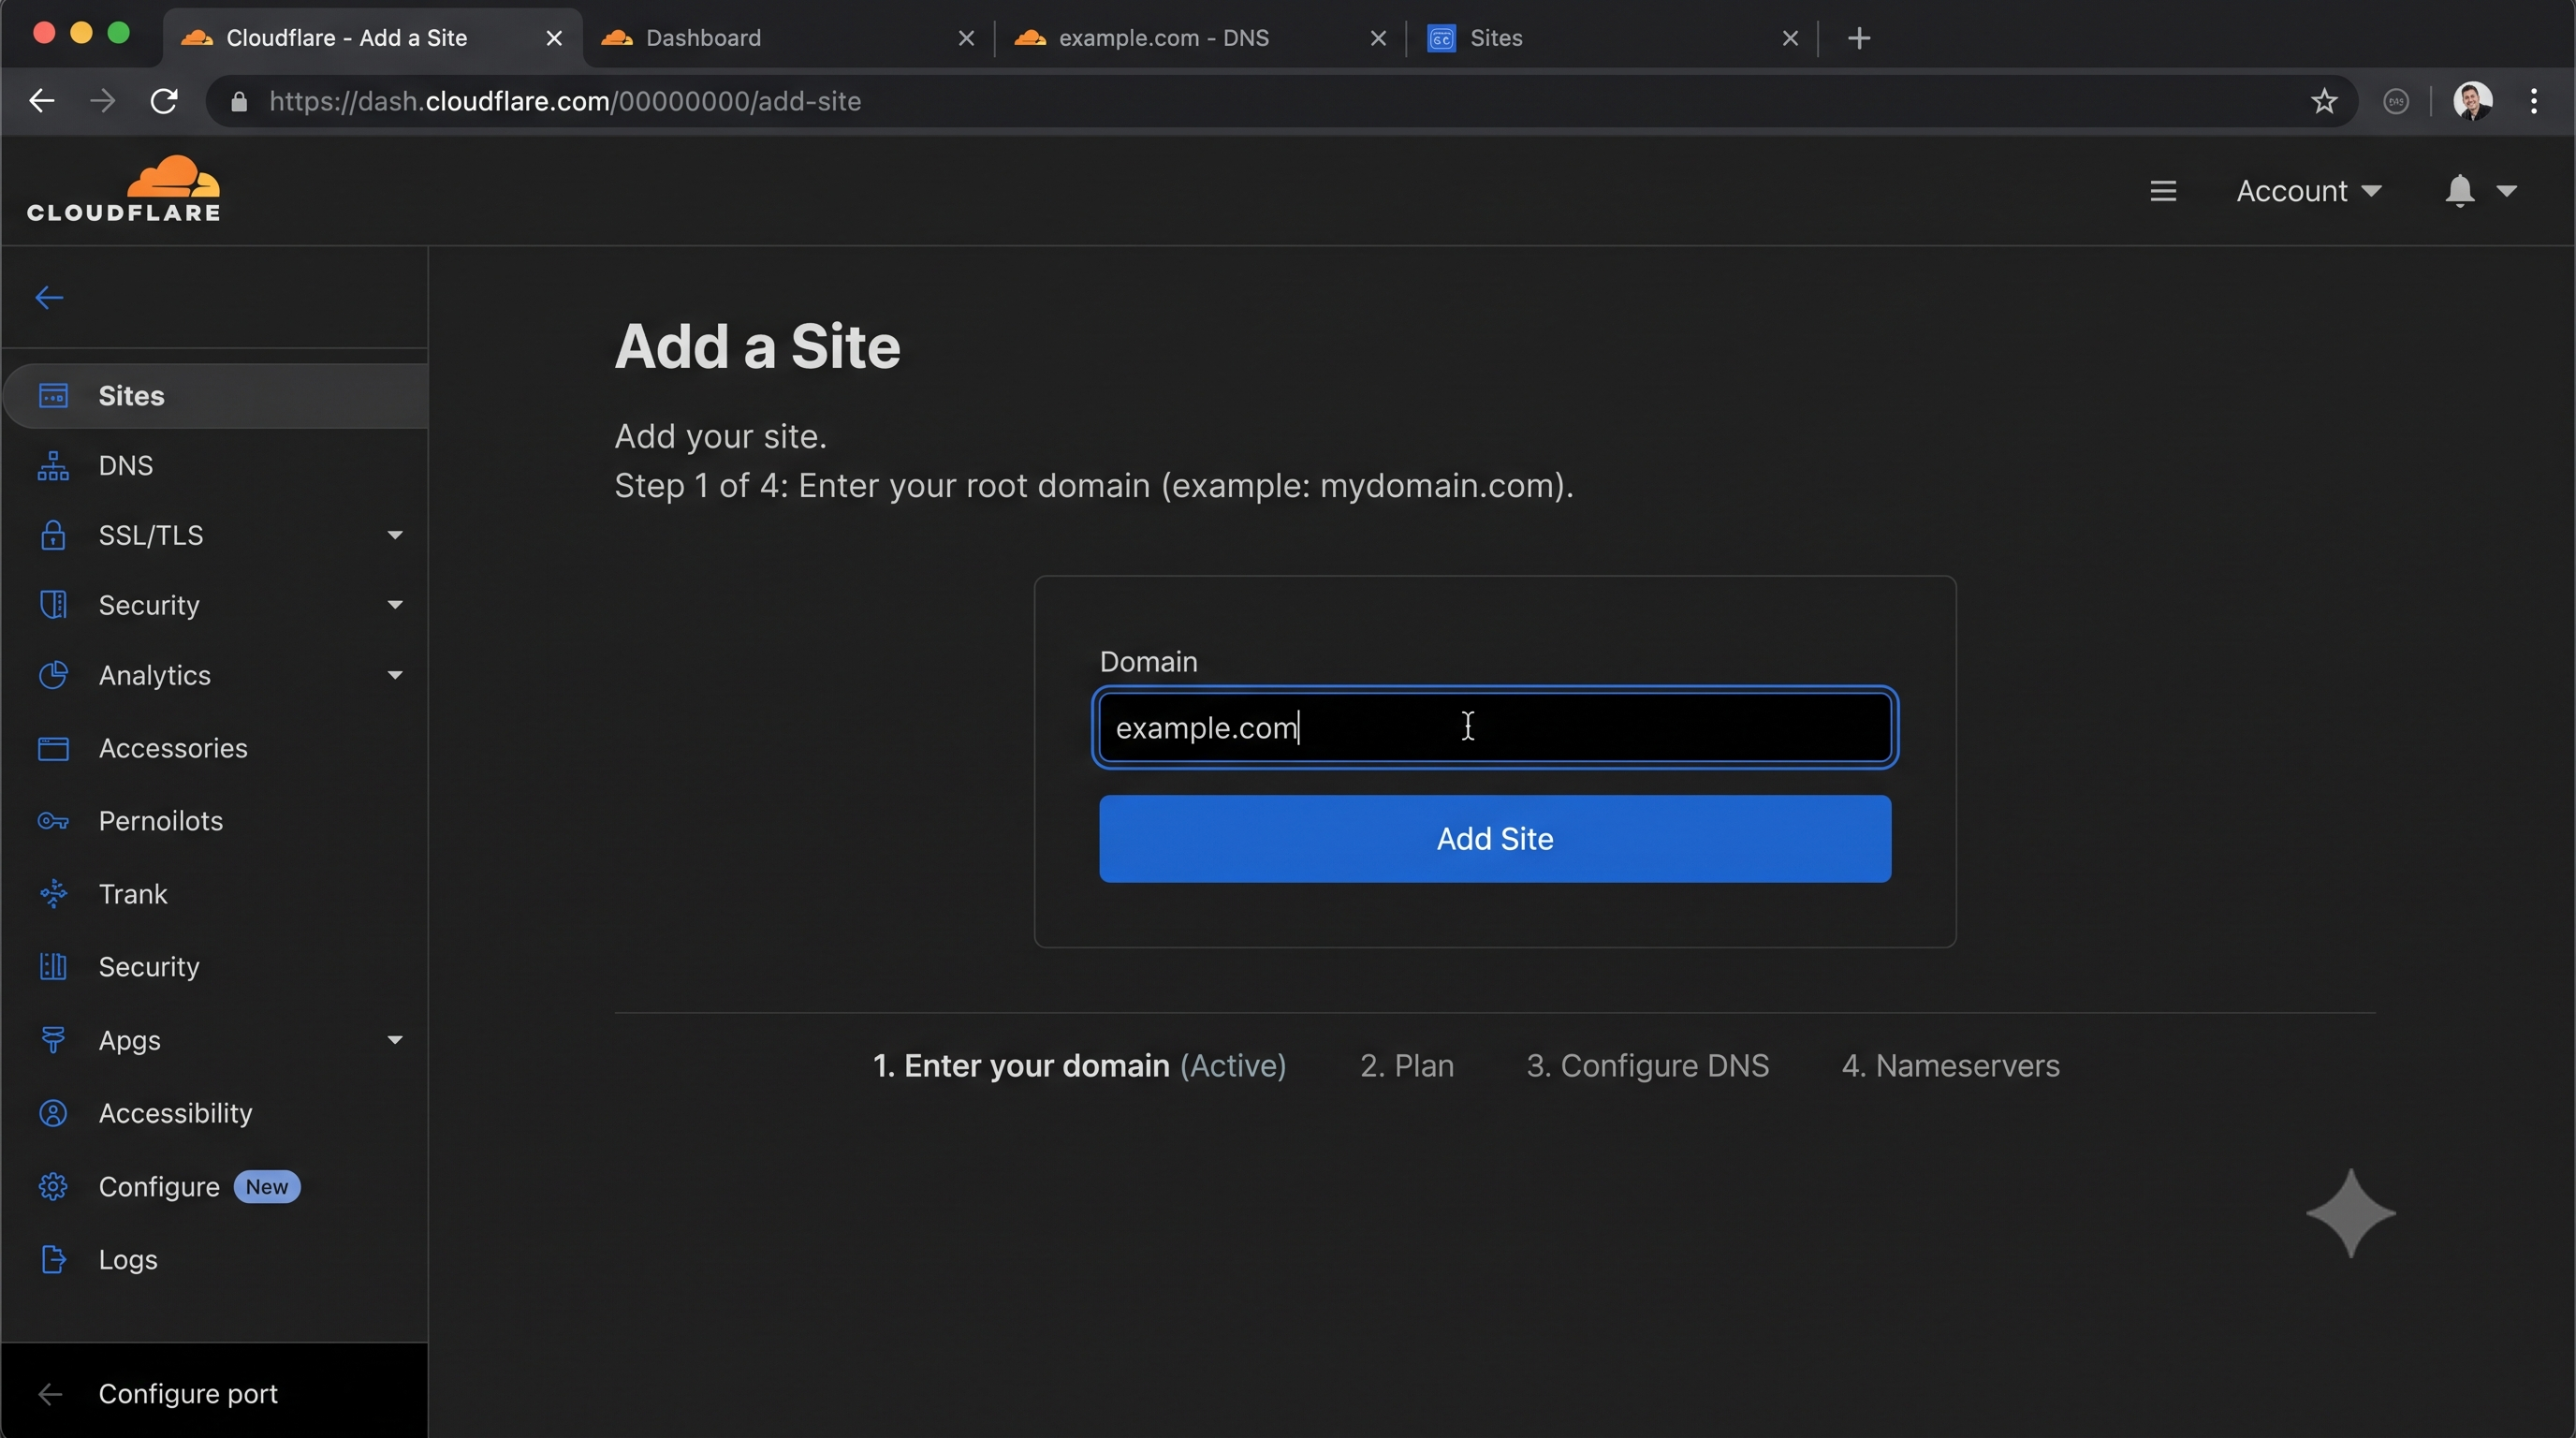
Add Your Domain
After logging in, click Add a Site from your dashboard. Enter your root domain (e.g., yourdomain.com) without any subdomain or protocol prefix. Click Add Site.
Select a Plan
Cloudflare will prompt you to choose a plan. Select Free unless you have a specific reason to upgrade. The free plan covers the features in this guide. Click Continue.
Step 2: Review Your Imported DNS Records
Cloudflare performs an automatic scan of your domain's existing DNS records. This is one of its most useful features — it gives you a pre-populated record set to review rather than requiring you to enter everything from scratch.
What to Look For
Cloudflare imports records based on public DNS data. In the review screen, verify:
- A records are correct for your root domain and any subdomains
- CNAME records for subdomains like
www,api,mailare present - MX records for your email are intact — these are critical. If they're missing, your email will break after you switch nameservers
- TXT records for domain verification (Google Search Console, email authentication like SPF, DKIM)
Proxy Status on Each Record
By default, Cloudflare may set some records as DNS-only. Go through each A and CNAME record that serves web traffic and ensure the orange cloud (Proxied) is enabled. Leave MX records and any email-related records as DNS-only.
Once you've reviewed and corrected the records, click Continue.
Step 3: Update Your Nameservers at Your Registrar
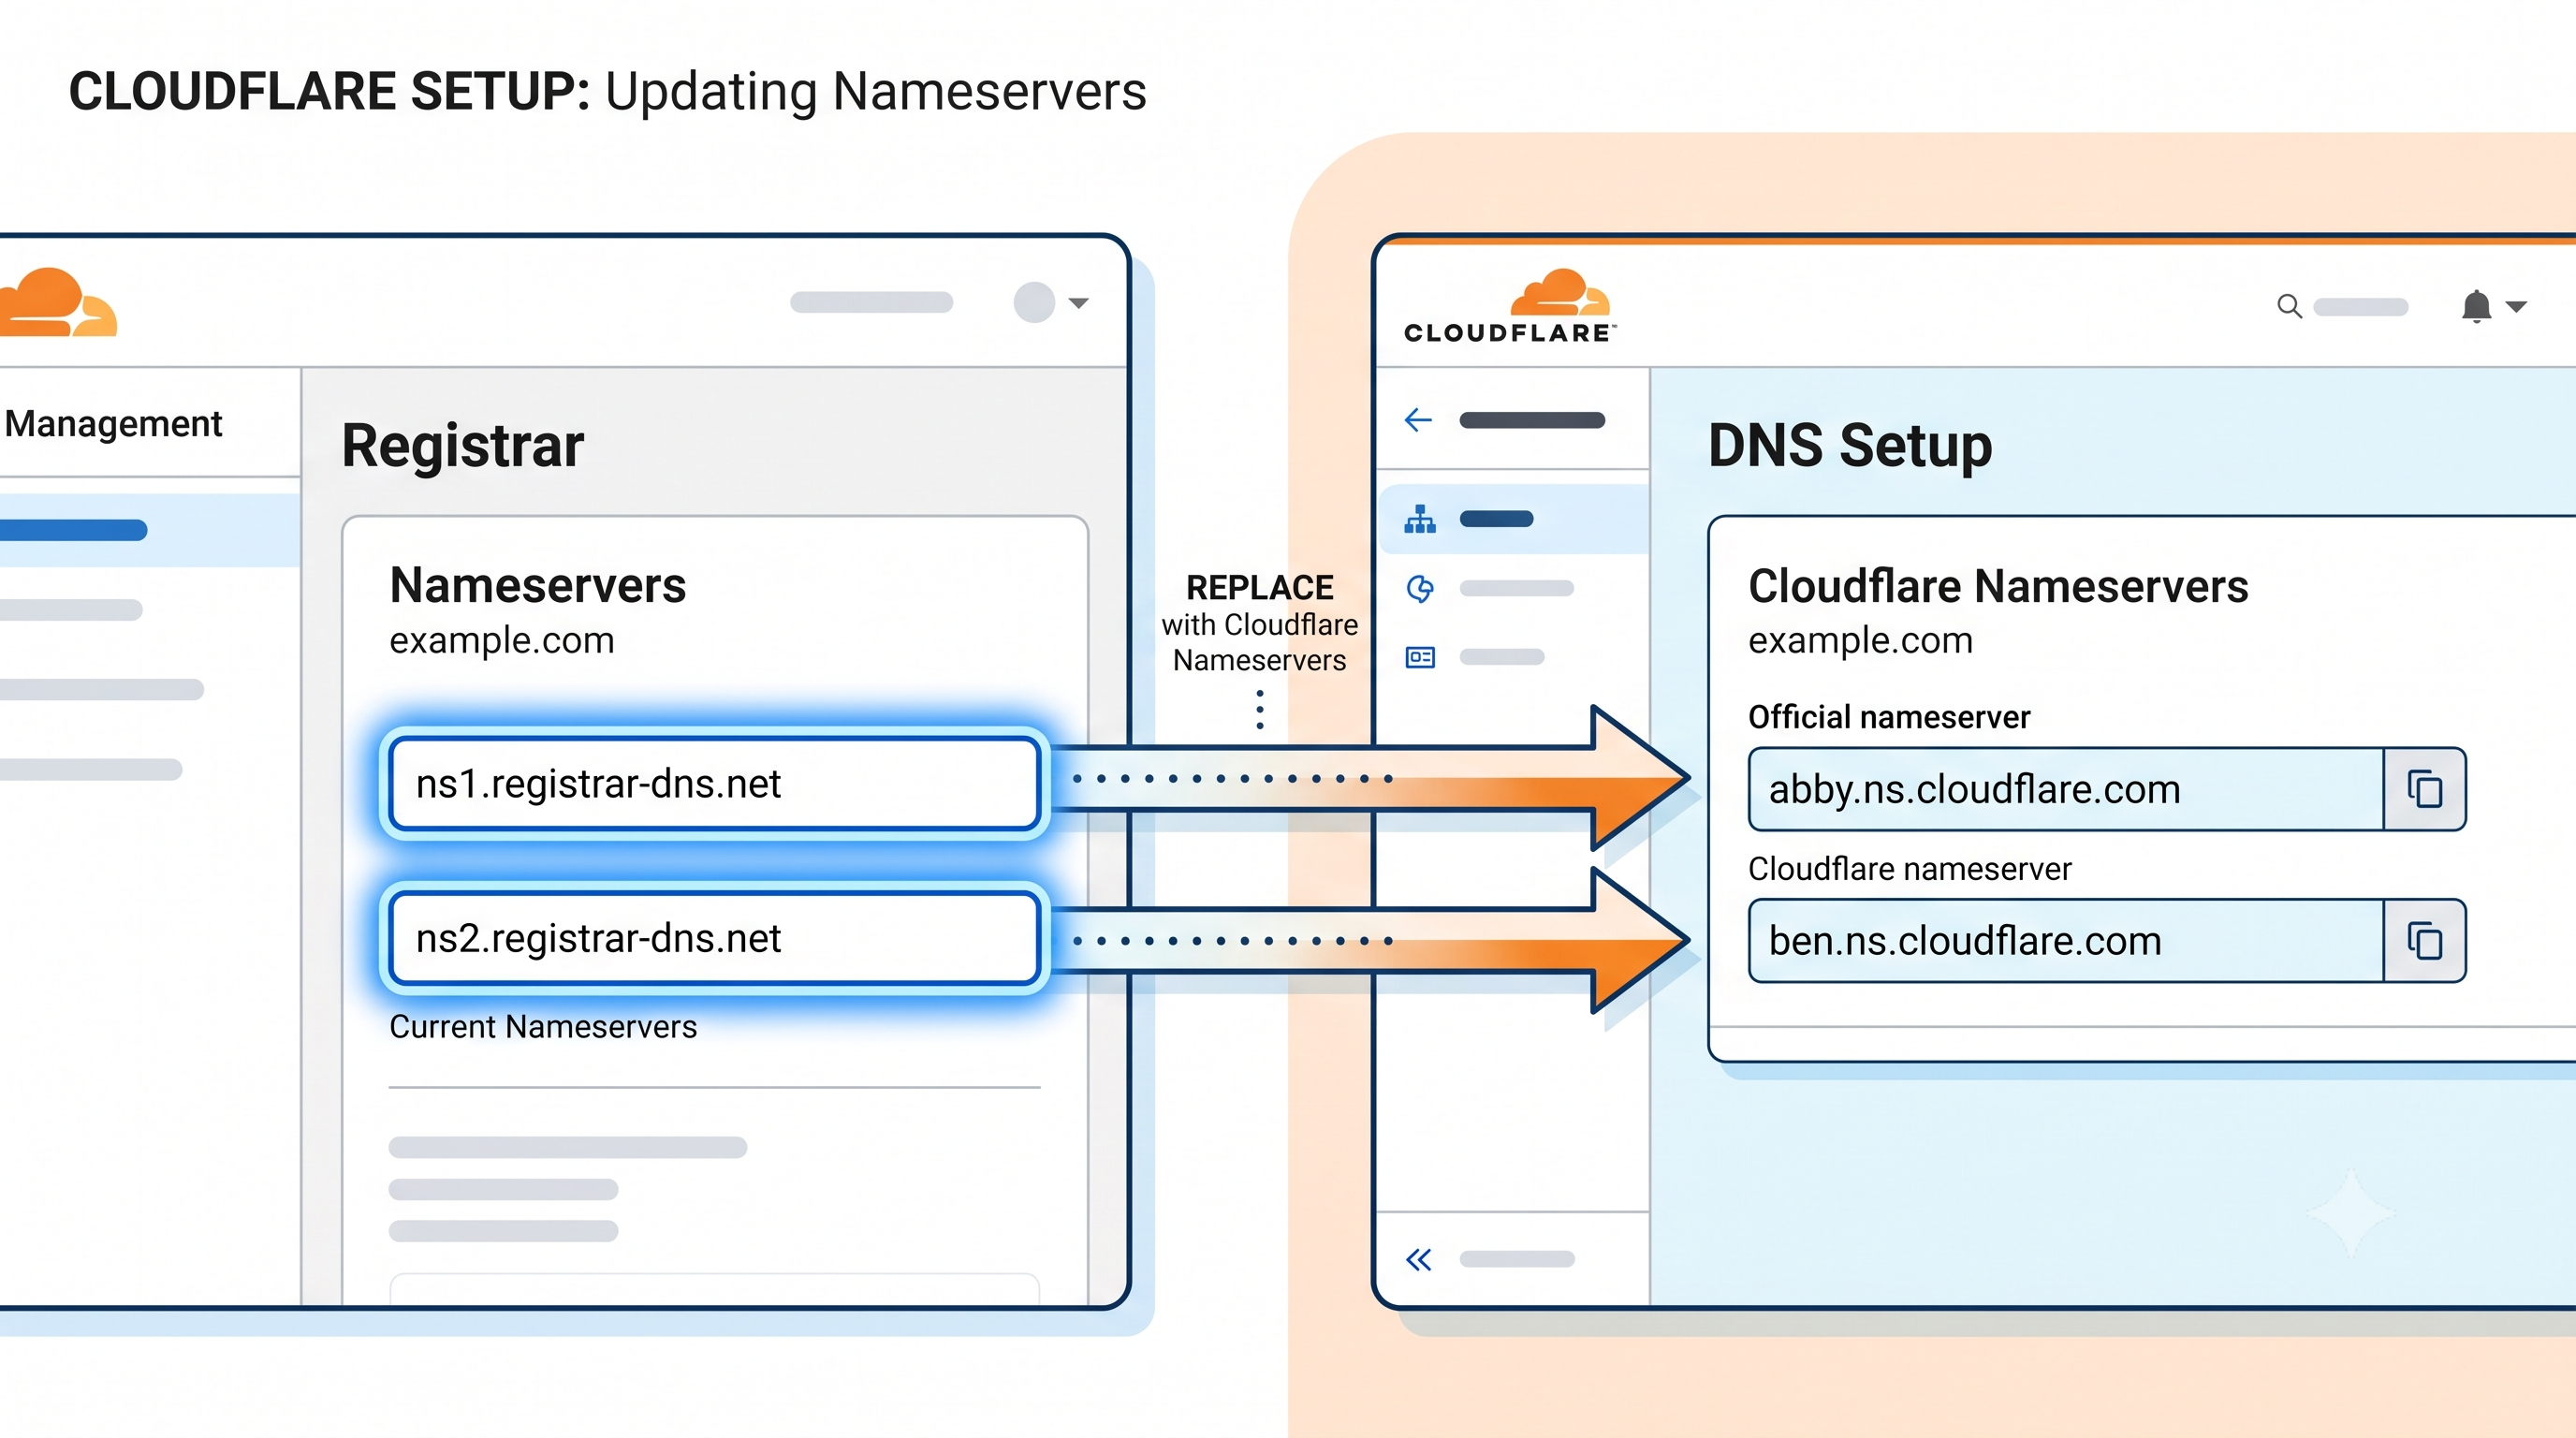
Cloudflare will give you two custom nameserver addresses — something like:
asha.ns.cloudflare.com
pablo.ns.cloudflare.com
These are unique to your account. You need to log into wherever you registered your domain and replace the existing nameservers with these two.
How to Update Nameservers
The process varies by registrar, but the general steps are:
- Log into your domain registrar (GoDaddy, Namecheap, Google Domains, etc.)
- Find the domain management or DNS settings for your domain
- Look for a Nameservers section — it may be labeled "Custom DNS", "Change Nameservers", or similar
- Delete the existing nameservers (usually 2–4 entries from your registrar)
- Add Cloudflare's two nameservers exactly as shown in your dashboard
- Save the changes
How Long Does It Take?
Nameserver propagation can take anywhere from a few minutes to 48 hours, though most registrars complete it within 1–2 hours. Cloudflare will send you an email when it detects the switch and activates your site.
You can check propagation status by running:
dig yourdomain.com NS +short
When this returns Cloudflare's nameservers, the switch is complete.
Step 4: Configure SSL/TLS Mode
Once your domain is active in Cloudflare, go to SSL/TLS in the left sidebar. The encryption mode you choose here determines how Cloudflare communicates with your origin server.
Flexible SSL
Cloudflare encrypts the connection between your visitor and Cloudflare (HTTPS), but sends traffic to your origin over plain HTTP. This works even if your origin has no SSL certificate at all.
The problem: Flexible SSL is only appropriate for legacy setups where you cannot install a certificate on your origin. If your origin already has SSL (and it should), Flexible can causeERR_TOO_MANY_REDIRECTS — more on that in the errors section.
Full SSL
Cloudflare encrypts both the visitor-to-Cloudflare connection and the Cloudflare-to-origin connection. Your origin needs an SSL certificate, but it doesn't need to be from a trusted certificate authority — a self-signed certificate is accepted.
This is better than Flexible and works for most setups.
Full (Strict) SSL — Recommended
The strongest option. Cloudflare requires your origin to have a valid, trusted SSL certificate (not self-signed). Both connections are fully encrypted and verified.
For production sites, use Full (Strict). If you're hosting on Vercel, Netlify, Railway, or any modern platform that auto-provisions Let's Encrypt certificates, your origin already has a valid cert and Full Strict will work immediately.Step 5: Key Security Settings
HSTS (HTTP Strict Transport Security)
Under SSL/TLS → Edge Certificates, you'll find the HSTS option. Enabling HSTS tells browsers to always use HTTPS for your domain, even if a user types http:// manually.
Configuration recommendations:
- Max Age: 6 months (15768000 seconds) to start; increase to 1 year once you're confident HTTPS is stable
- Include Subdomains: Enable only if all subdomains serve HTTPS
- Preload: Leave off initially — preloading submits your domain to browser preload lists and is difficult to reverse
Bot Fight Mode
Under Security → Bots, enable Bot Fight Mode. This automatically challenges traffic from known bot networks, scrapers, and automated tools. For the vast majority of sites, this reduces unwanted bot traffic without affecting legitimate visitors.
If you have specific integrations that use automated HTTP requests (monitoring tools, search engine bots you want to allow, webhook senders), review the allow-list options before enabling. Google, Bing, and other major search engine crawlers are already excluded from Bot Fight Mode by default.
Step 6: Performance Settings
Brotli Compression
Under Speed → Optimization, enable Brotli. Brotli is a modern compression algorithm that typically achieves 15–25% better compression ratios than Gzip for text-based assets (HTML, CSS, JavaScript). Supported by all modern browsers, it reduces page weight with zero configuration required.
Auto Minify
Also under Speed → Optimization, enable minification for JavaScript, CSS, and HTML. Cloudflare strips whitespace, comments, and unnecessary characters from these files before serving them to visitors. This is a zero-risk performance win for most sites.
Note: If you're already minifying at build time (which Next.js, Vite, and most modern frameworks do automatically), enabling Cloudflare's minification on top has minimal additional benefit. But it doesn't hurt.Cloudflare + Vercel: Setting SSL to Full
If you're deploying on Vercel and routing traffic through Cloudflare, there's one critical configuration step that trips up many developers.
Vercel automatically provisions Let's Encrypt SSL certificates for all deployments — including your custom domain. This means your origin always has a valid, trusted certificate. You should set Cloudflare's SSL mode to Full (Strict).
Why this matters: If you leave SSL set to Flexible, here's what happens:- Visitor hits Cloudflare over HTTPS
- Cloudflare forwards to Vercel over HTTP
- Vercel detects plain HTTP and redirects to HTTPS
- Cloudflare again hits Vercel over HTTP...
- Infinite redirect loop →
ERR_TOO_MANY_REDIRECTS
Setting SSL to Full (Strict) breaks this loop by having Cloudflare connect to Vercel over HTTPS from the start. The redirect never fires.
Common Errors and Fixes
ERR_TOO_MANY_REDIRECTS
Cause: SSL mode is set to Flexible, but your origin is also redirecting HTTP to HTTPS, creating an infinite loop. Fix: Change Cloudflare SSL/TLS mode to Full or Full (Strict). This is almost always the right fix.Email Stops Working After Switching Nameservers
Cause: MX records weren't imported correctly, or the orange cloud is enabled on an MX-related record. Fix: Go to DNS in Cloudflare, find your MX records, and ensure they exist and are set to DNS Only (grey cloud). Also check that any SPF TXT records carried over correctly. If you use Google Workspace or Microsoft 365, the specific records required are documented in their respective admin panels.Site Shows "Too Many Redirects" on www but Not Root (or Vice Versa)
Cause: One record is proxied and one isn't, creating inconsistent SSL behavior. Fix: Ensure consistent proxy status across your A record (@) and CNAME (www). Both should be Proxied (orange cloud) for a standard setup.
Cloudflare Shows "Not Active" After 24 Hours
Cause: Nameservers weren't updated correctly at the registrar, or the registrar hasn't propagated the change yet. Fix: Re-check the nameserver values at your registrar. Copy-paste directly from the Cloudflare dashboard to avoid typos. Rundig yourdomain.com NS to verify what nameservers are currently live.
Frequently Asked Questions
Do I need to transfer my domain to Cloudflare to use it?No. Cloudflare Registrar is optional. You can keep your domain registered anywhere (GoDaddy, Namecheap, Google Domains) and simply update the nameservers to point to Cloudflare. The registrar and the DNS provider are separate roles.
Will Cloudflare affect my Google Search Console verification?TXT records used for domain verification pass through Cloudflare DNS without issue. As long as the verification TXT record was imported (or you add it manually), Search Console verification works normally.
Can I use Cloudflare on a subdomain only?Yes, through a feature called Cloudflare for SaaS or by using CNAME setup (available on Business/Enterprise plans). The standard free plan requires you to proxy at the root domain level. For most use cases, adding the full domain is the simpler path.
Does enabling the orange cloud hide my real server IP?Yes. When a record is proxied, Cloudflare's IP addresses are returned in DNS queries instead of your origin IP. This is one of the key security benefits — it prevents attackers from targeting your origin directly.
Is the free plan enough for a production site?For most sites, yes. The free plan includes unlimited bandwidth, DDoS protection, the global CDN, free SSL, Bot Fight Mode, and basic firewall rules. The paid plans add more advanced WAF rules, image optimization, analytics, and support. Start with free and upgrade when you hit a specific limitation.
Take Your Infrastructure Further With Amex Technology
Setting up Cloudflare correctly is the foundation of a resilient, performant web infrastructure — but it's just one layer of a production-grade stack. A complete setup also includes edge caching strategy, cache purge automation, performance budgets, monitoring that correlates CDN events with application errors, and security rules tuned to your traffic patterns.
At Amex Technology, we help teams build and optimize the full deployment stack — from DNS and CDN configuration to CI/CD pipelines and observability. If you're setting up a new project or hardening an existing one, we'd be glad to review your setup.
Explore our software development services, see our Portfolio, or get in touch to talk through your project.
Related Services
Need help building this?
Our team specializes in exactly this kind of work. Get a free quote and honest assessment within 24 hours.
Start a Project