
Why Transactional Email Is Harder Than It Looks
Transactional emails — password resets, order confirmations, welcome emails, invoice receipts — are some of the most business-critical messages your application sends. If they don't land in the inbox, users can't log in, can't complete purchases, and assume your product is broken.
The problem is that email delivery is genuinely complex. Every major email provider (Gmail, Outlook, Apple Mail) uses a combination of IP reputation, domain reputation, content filtering, and authentication checks to decide whether a message goes to the inbox or the spam folder. Getting this right with raw SMTP is a full-time job.
This is why developers reach for email delivery services. For years, SendGrid and Mailgun dominated this space. But both carry the baggage of legacy APIs, confusing dashboards, and aggressive spam filtering on shared IP pools that punish new senders for the bad behaviour of other accounts.
Resend is the modern alternative. Built specifically for developers, it has a clean REST API, first-class React Email integration for building templates, and an excellent free tier (3,000 emails per month, 100/day) that covers most side projects and early-stage products.Creating a Resend Account and Getting Your API Key
Go to resend.com and sign up with your GitHub account or email. The onboarding flow is fast — you're in the dashboard within two minutes.
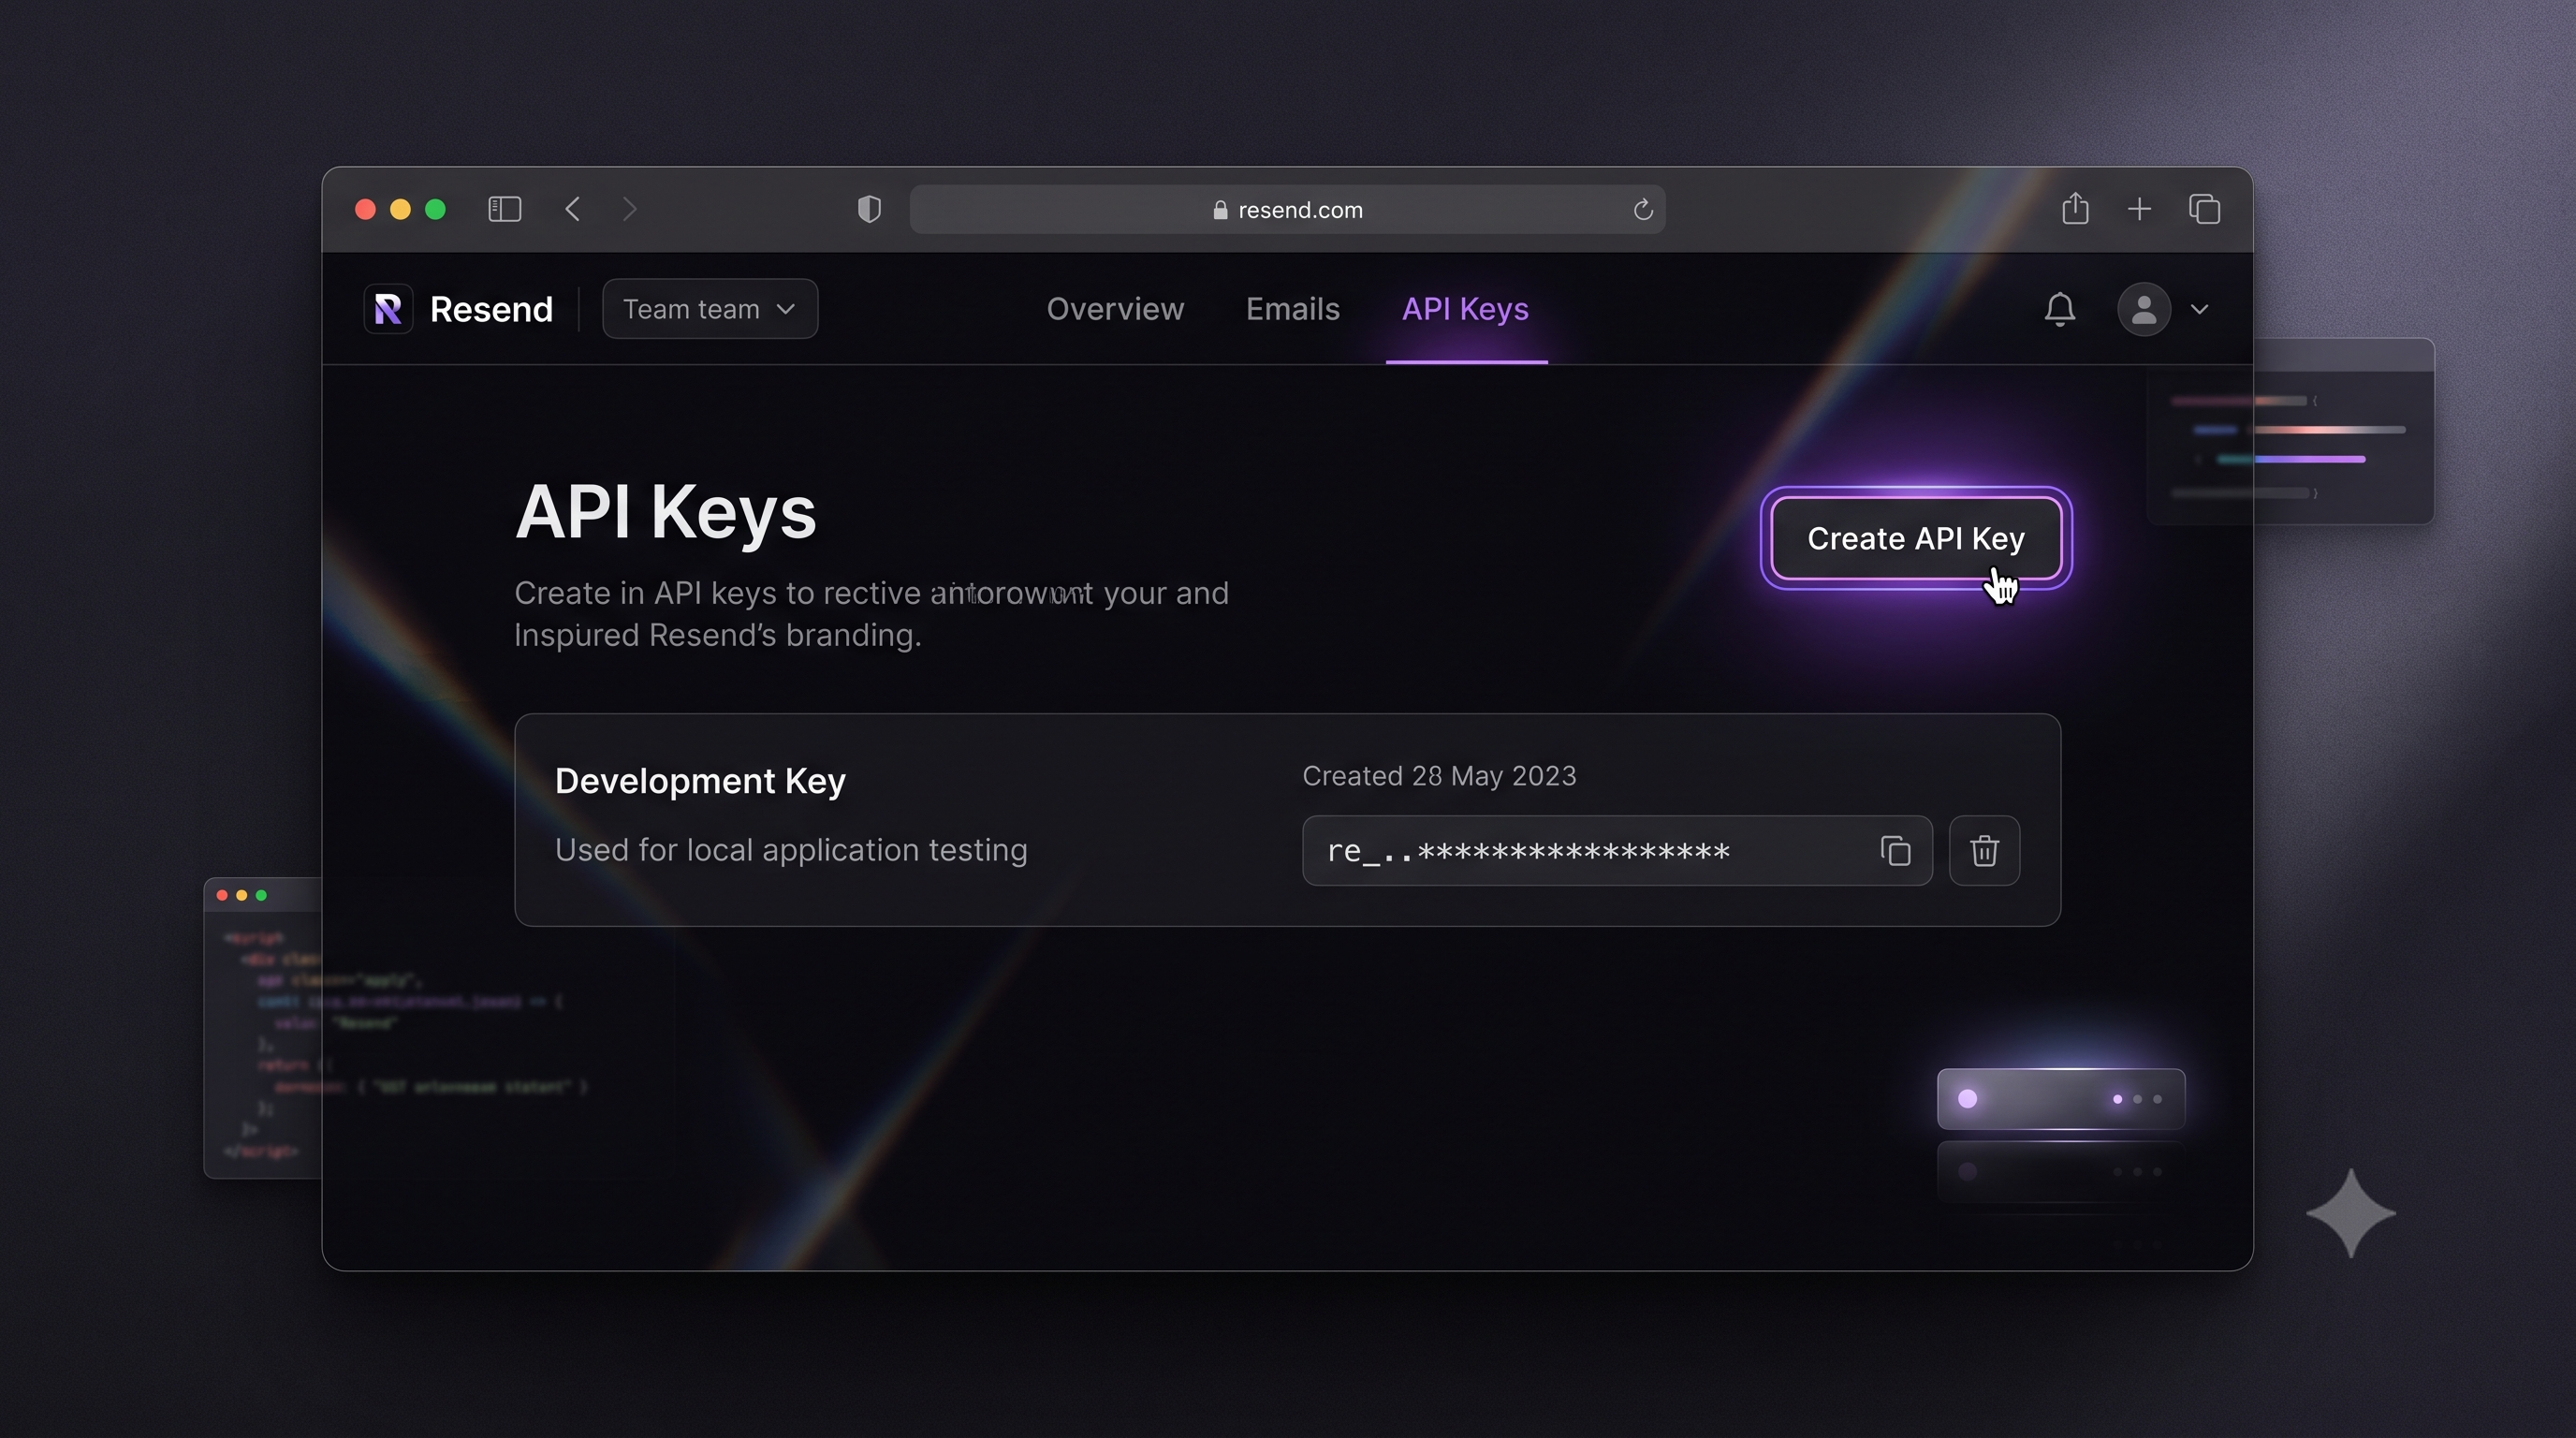
Once inside, navigate to API Keys in the left sidebar and click Create API Key. Give it a descriptive name (e.g., production-app or local-dev) and select the appropriate permission level:
- Full Access — can send emails and manage domain settings. Use for your production server.
- Sending Access — can only send emails. Safer for application use; recommended.
Click Add and copy the key immediately. Resend only shows the full key once. Store it in your environment variables — never in source code.
RESEND_API_KEY=re_xxxxxxxxxxxxxxxxxxxx
On Vercel or any deployment platform, add this as a secret environment variable. Locally, add it to your .env.local file (which should be in .gitignore).
Adding and Verifying Your Sending Domain
You can send from Resend's shared domain (onboarding@resend.dev) immediately, but for production you must send from your own domain. This is both a deliverability requirement (Gmail and Outlook increasingly filter mail from shared sender pools) and a branding requirement.
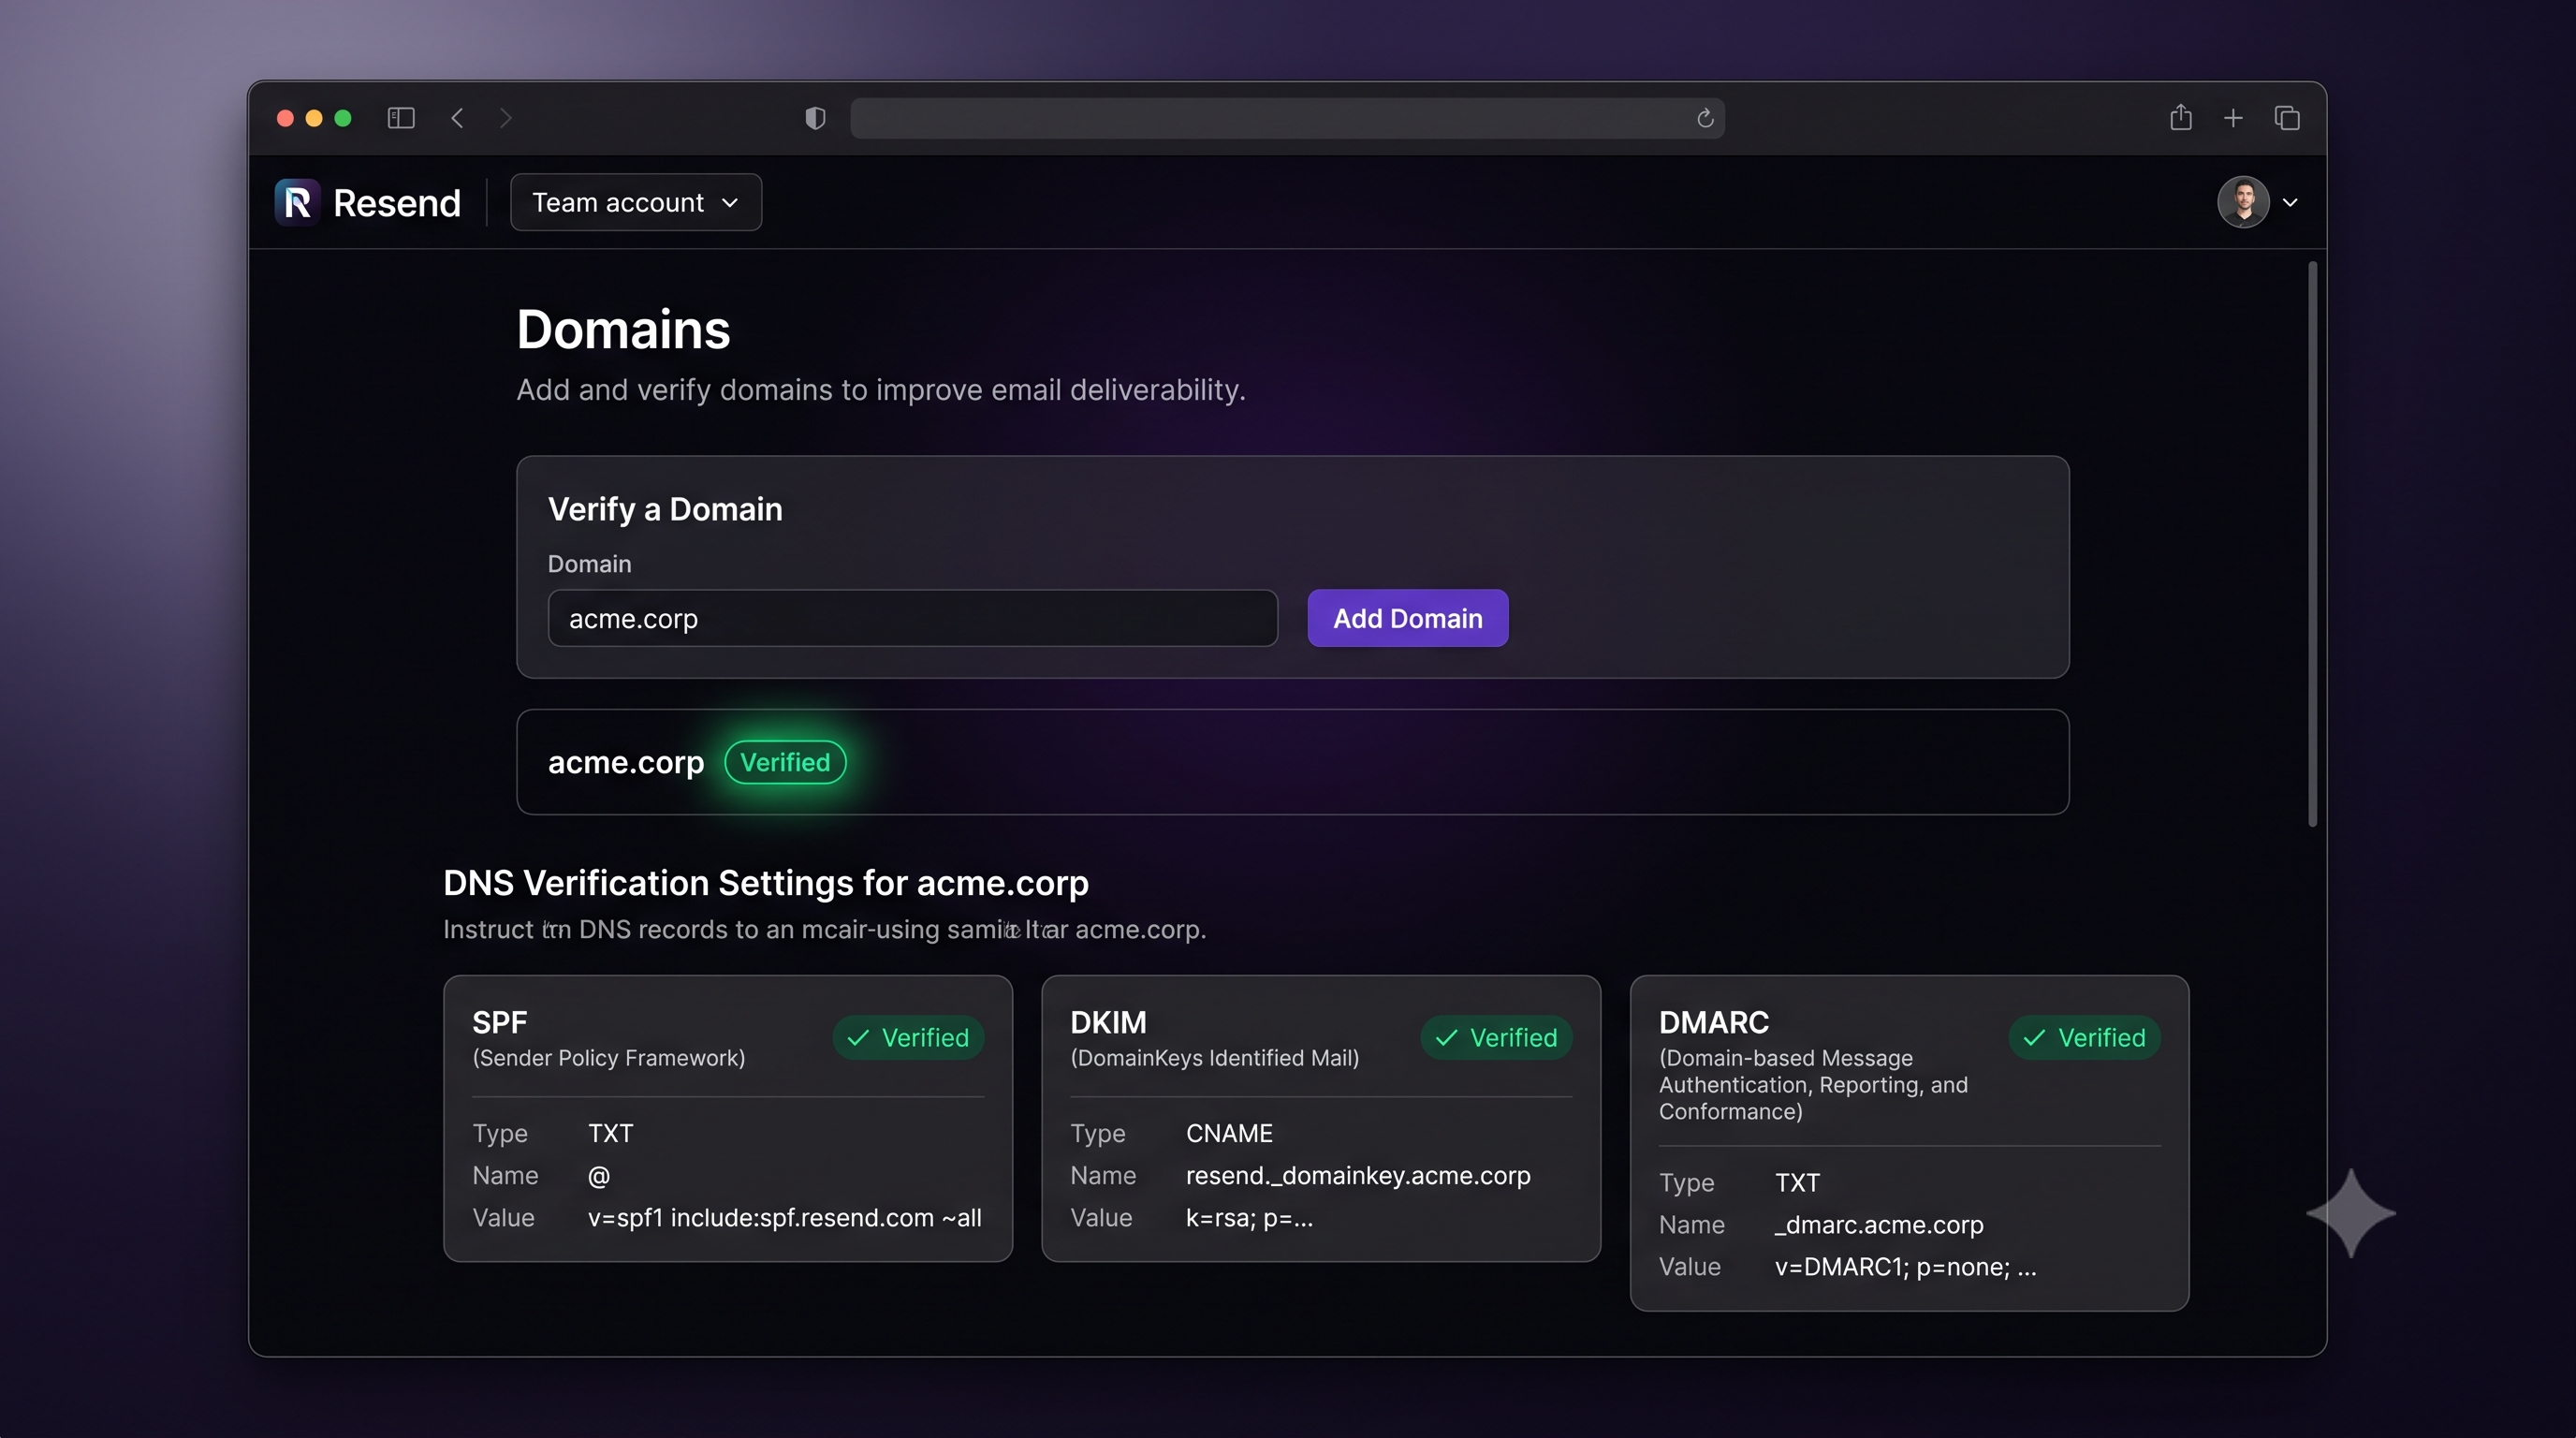
In the Resend dashboard, go to Domains → Add Domain. Enter your root domain (e.g., yourdomain.com). Resend will give you three DNS records to add at your domain registrar.
SPF Record (Sender Policy Framework)
SPF is a TXT record that tells receiving mail servers which IP addresses are authorized to send email on behalf of your domain.
Type:  TXT
Name:  @
Value: v=spf1 include:amazonses.com ~all
Resend uses Amazon SES infrastructure under the hood, so the SPF record authorizes Amazon's sending IPs. The ~all at the end is a "soft fail" — messages from unauthorized sources are flagged but not rejected outright, which is the standard practice.
DKIM Record (DomainKeys Identified Mail)
DKIM adds a cryptographic signature to every outbound message. The receiving server looks up the public key in your DNS and verifies the signature, confirming the email wasn't tampered with in transit.
Resend generates the key pair. You add the public key as a CNAME record:
Type:  CNAME
Name:  resend._domainkey
Value: resend._domainkey.yourdomain.com.dkim.resend.com
Without DKIM, your emails are more likely to be flagged as spoofed. This is the most important authentication record.
DMARC Record (Domain-based Message Authentication)
DMARC ties SPF and DKIM together and tells receiving servers what to do when a message fails both checks.
Type:  TXT
Name:  _dmarc
Value: v=DMARC1; p=none; rua=mailto:dmarc@yourdomain.com
Start with p=none (monitor mode) — this means failing messages are still delivered but Resend can report on them. Once you've confirmed your legitimate email passes authentication, tighten to p=quarantine (send to spam) or p=reject (block entirely).
After adding all three records, return to the Resend dashboard and click Verify. DNS propagation usually takes 15–60 minutes. Once all three records show a green checkmark, your domain is verified and ready to send.
Installing the Resend SDK
In your project directory:
npm install resend
That's the only dependency needed for sending emails. For React Email templates (covered below), you'll install additional packages.
Sending Your First Email With the SDK

With the SDK installed and your API key in environment variables, sending an email takes five lines:
import { Resend } from 'resend';
const resend = new Resend(process.env.RESEND_API_KEY);
const { data, error } = await resend.emails.send({
  from: 'Your App <noreply@yourdomain.com>',
  to: ['user@example.com'],
  subject: 'Welcome to Your App',
  html: '<p>Thanks for signing up! We are glad you are here.</p>',
});
The from field must use a domain you have verified in Resend. The to field accepts a string or array of strings. The html field accepts any HTML string — though for production you'll want to use React Email templates rather than raw HTML strings.
Using React Email for Templates
React Email lets you build HTML email templates as React components, using a set of cross-client-compatible primitives. This solves one of the ugliest problems in email development: different email clients (Gmail web, Outlook desktop, Apple Mail) render HTML very differently, and writing HTML that works everywhere is painful.
Install React Email and the component library:
npm install @react-email/components react-email
Create a template file at src/emails/WelcomeEmail.tsx:
import {
  Html,
  Head,
  Body,
  Container,
  Heading,
  Text,
  Button,
  Hr,
} from '@react-email/components';
interface WelcomeEmailProps {
  name: string;
  loginUrl: string;
}
export default function WelcomeEmail({ name, loginUrl }: WelcomeEmailProps) {
  return (
    <Html>
      <Head />
      <Body style={{ backgroundColor: '#f6f9fc', fontFamily: 'sans-serif' }}>
        <Container style={{ maxWidth: '560px', margin: '0 auto', padding: '40px 20px' }}>
          <Heading style={{ color: '#1a1a1a' }}>Welcome, {name}</Heading>
          <Text style={{ color: '#555', lineHeight: '1.6' }}>
            Your account is ready. Click the button below to sign in for the first time.
          </Text>
          <Button
            href={loginUrl}
            style={{ backgroundColor: '#6366f1', color: '#fff', padding: '12px 24px', borderRadius: '6px' }}
          >
            Sign In
          </Button>
          <Hr style={{ borderColor: '#e4e4e7', margin: '32px 0' }} />
          <Text style={{ color: '#999', fontSize: '12px' }}>
            If you did not create this account, you can safely ignore this email.
          </Text>
        </Container>
      </Body>
    </Html>
  );
}
To render this to an HTML string for Resend, use the render function from @react-email/components:
import { render } from '@react-email/components';
import WelcomeEmail from '@/emails/WelcomeEmail';
const html = await render(<WelcomeEmail name="Jane" loginUrl="https://app.example.com/login" />);
Integrating Resend in a Next.js App Router API Route
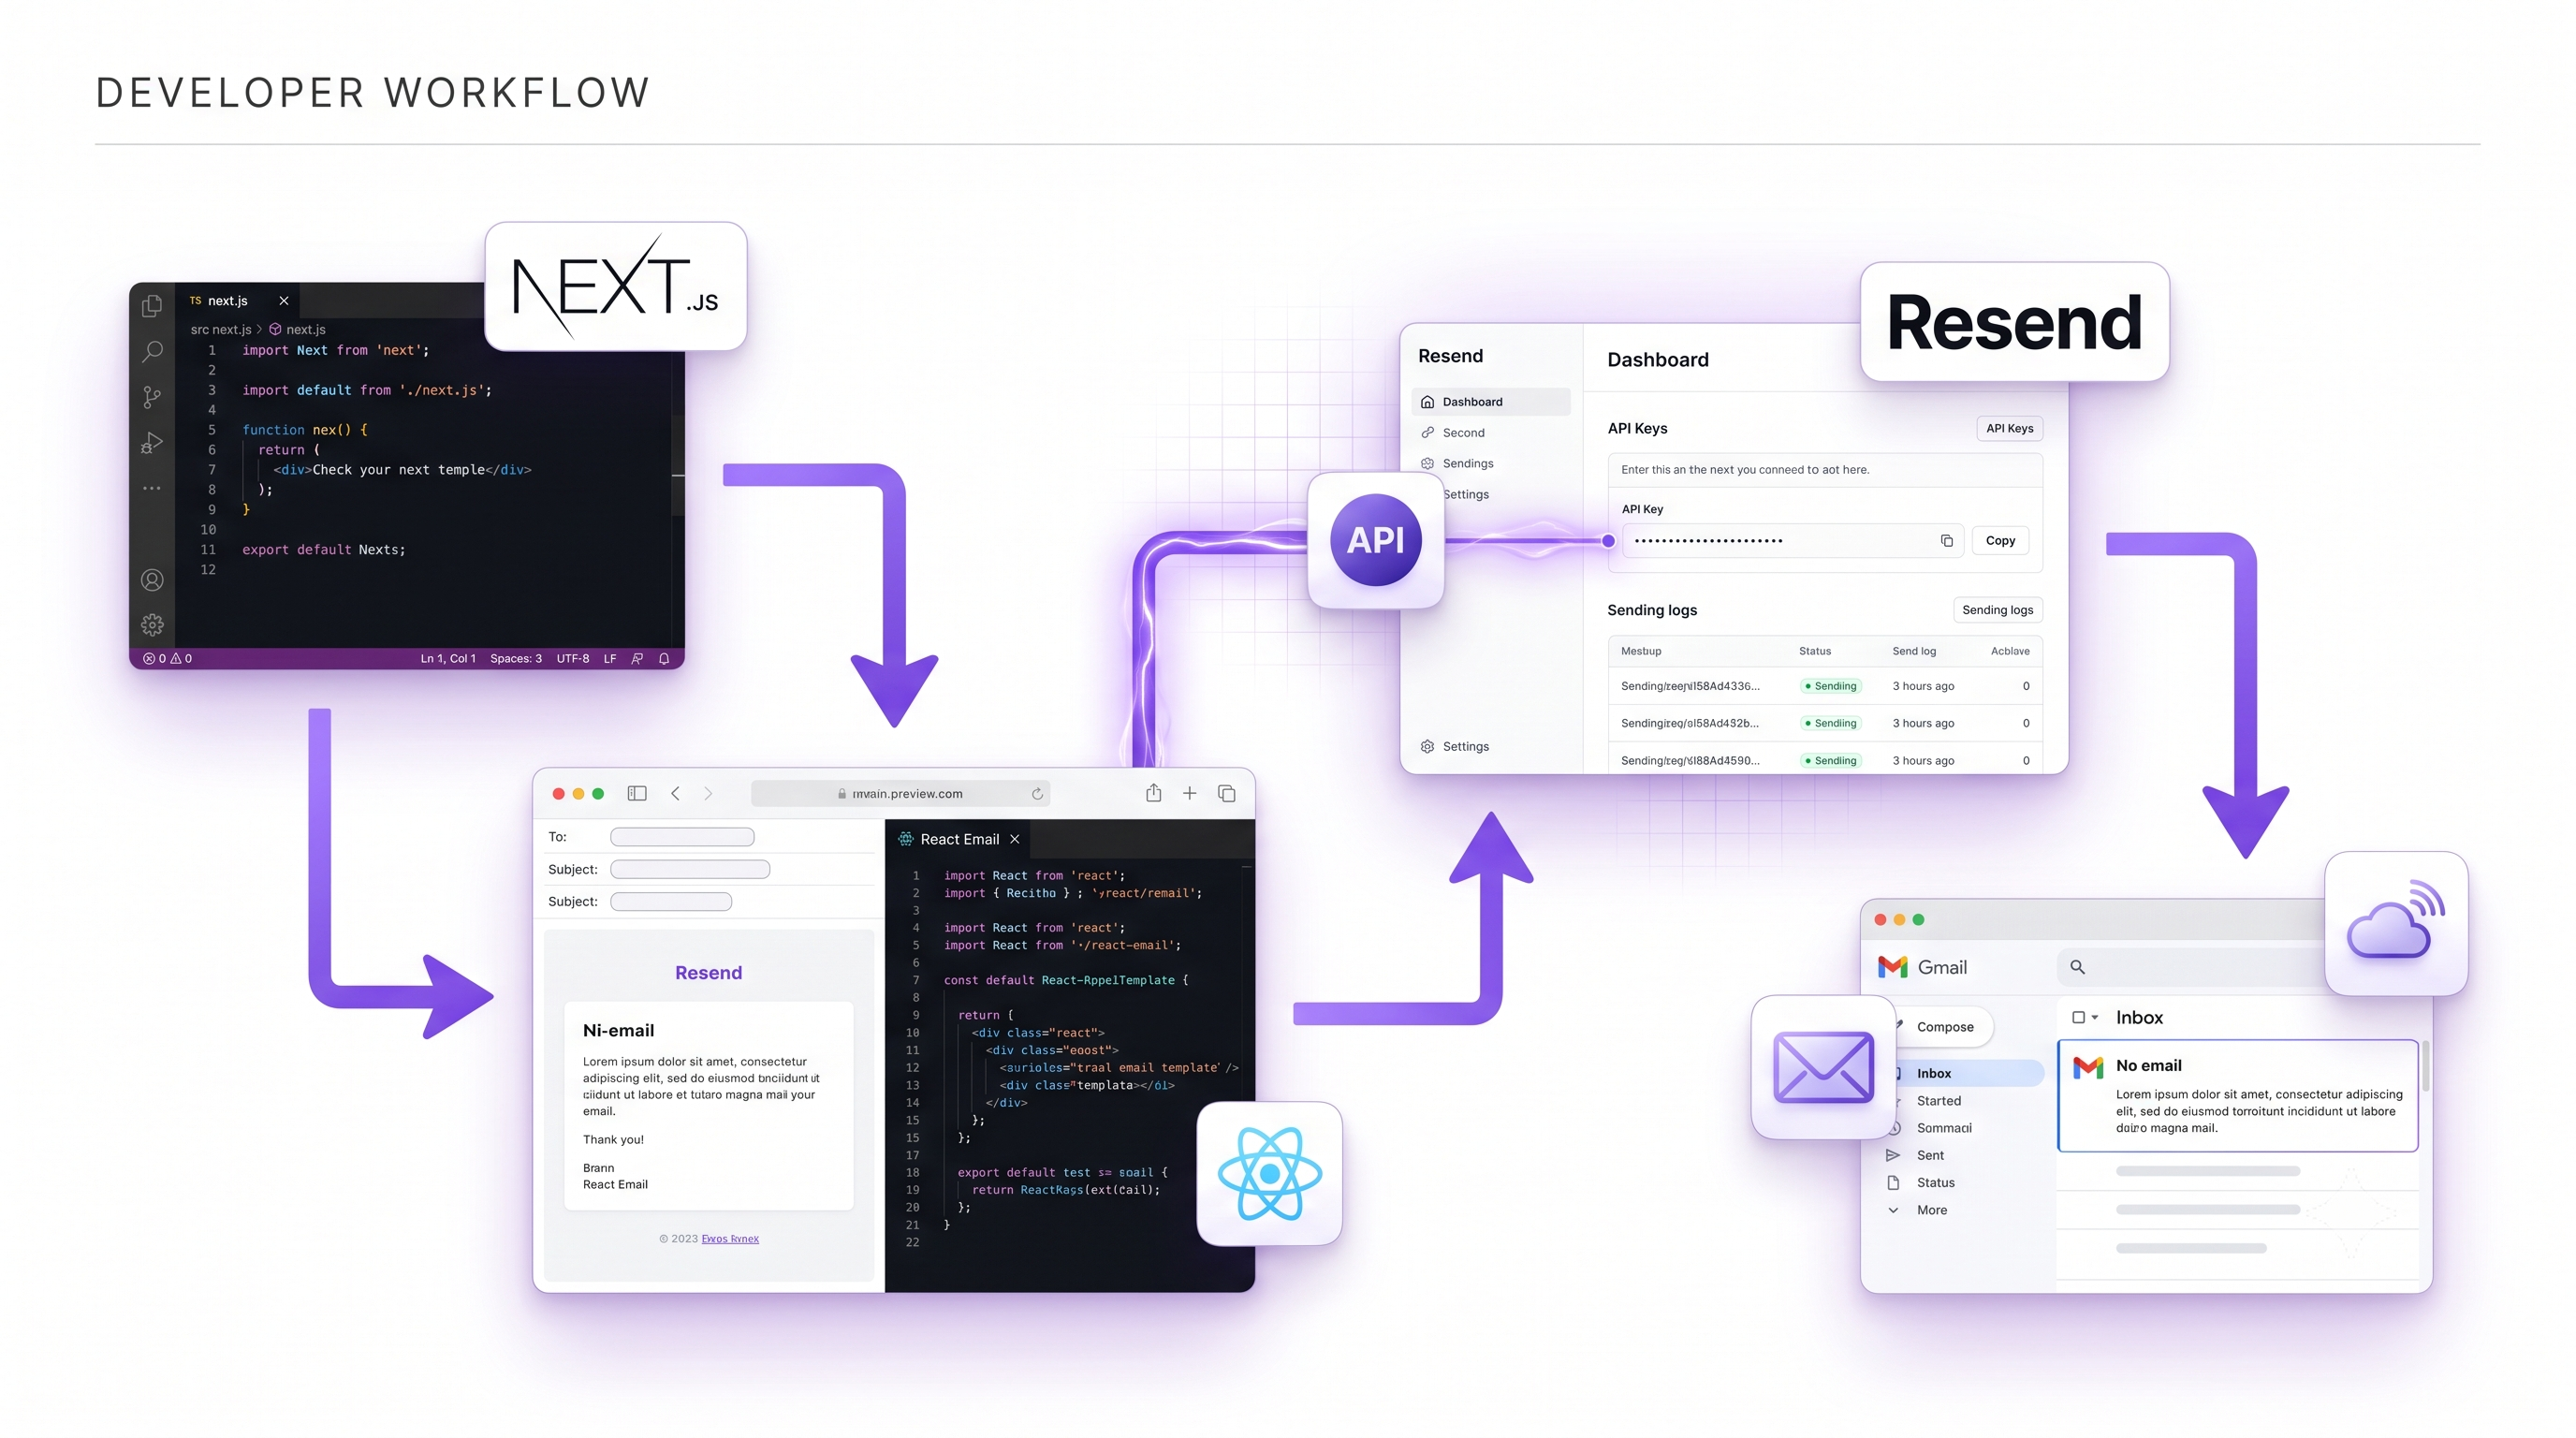
Here is a complete, production-ready API route at src/app/api/send/route.ts:
import { NextRequest, NextResponse } from 'next/server';
import { Resend } from 'resend';
import { render } from '@react-email/components';
import WelcomeEmail from '@/emails/WelcomeEmail';
const resend = new Resend(process.env.RESEND_API_KEY);
export async function POST(req: NextRequest) {
  const { name, email } = await req.json();
  if (!name || !email) {
    return NextResponse.json({ error: 'Missing required fields' }, { status: 400 });
  }
  const html = await render(
    <WelcomeEmail name={name} loginUrl={`https://yourdomain.com/login`} />
  );
  const { data, error } = await resend.emails.send({
    from: 'Your App <noreply@yourdomain.com>',
    to: [email],
    subject: `Welcome to Your App, ${name}!`,
    html,
  });
  if (error) {
    console.error('Resend error:', error);
    return NextResponse.json({ error: 'Failed to send email' }, { status: 500 });
  }
  return NextResponse.json({ id: data?.id });
}
This route validates inputs, renders the React Email template to HTML, sends the email, and returns the Resend message ID on success or a structured error on failure. The Resend instance is created outside the handler so it is reused across requests in the same function instance.
Handling Form Submissions with Loading and Error States
On the client side, calling this route from a form with proper feedback:
'use client';
import { useState } from 'react';
export default function SignupForm() {
  const [status, setStatus] = useState<'idle' | 'loading' | 'success' | 'error'>('idle');
  async function handleSubmit(e: React.FormEvent<HTMLFormElement>) {
    e.preventDefault();
    setStatus('loading');
    const form = e.currentTarget;
    const name = (form.elements.namedItem('name') as HTMLInputElement).value;
    const email = (form.elements.namedItem('email') as HTMLInputElement).value;
    const res = await fetch('/api/send', {
      method: 'POST',
      headers: { 'Content-Type': 'application/json' },
      body: JSON.stringify({ name, email }),
    });
    setStatus(res.ok ? 'success' : 'error');
  }
  return (
    <form onSubmit={handleSubmit}>
      <input name="name" type="text" placeholder="Your name" required />
      <input name="email" type="email" placeholder="Your email" required />
      <button type="submit" disabled={status === 'loading'}>
        {status === 'loading' ? 'Sending...' : 'Sign Up'}
      </button>
      {status === 'success' && <p>Check your inbox — email sent!</p>}
      {status === 'error' && <p>Something went wrong. Please try again.</p>}
    </form>
  );
}
Best Practices for Deliverability
Getting emails delivered to the inbox consistently requires more than just having a verified domain.
Use a consistent sending address. Pick onefrom address per email type and stick to it. Changing senders frequently damages reputation.
Warm up new domains gradually. A brand-new domain that suddenly sends 1,000 emails on day one will trigger spam filters. Start with small batches (10–50/day), ramp up over two to four weeks.
Include a plain-text version. Emails with only HTML content score lower with some spam filters. Resend supports a text field alongside html — always include a plain-text fallback.
Avoid spam trigger words in subjects. Phrases like "FREE!!!", "Act Now", or "You've been selected" train spam filters against you. Write subject lines the way you'd write them to a colleague.
Handle bounces and complaints. Resend's webhook system can notify your application when an email hard-bounces or is marked as spam. Remove those addresses from your mailing list immediately — continued sending to bad addresses damages your domain reputation.
Testing With Resend's Email Logs
One of Resend's standout features is the Logs section in the dashboard. Every email you send is recorded with its full status: delivered, bounced, opened (if tracking is enabled), or failed.
When debugging a deliverability issue, check Logs first. You'll see the exact error message Resend received from the recipient's mail server — far more useful than a generic "email failed to send" error from most providers.
You can also use Resend's test email addresses (delivered@resend.dev, bounced@resend.dev, complained@resend.dev) to simulate different delivery outcomes without sending to real users. This is especially useful for testing your webhook handling logic.
Common Errors and Fixes
"The domain is not verified"
Your from address uses a domain that hasn't been verified in Resend, or verification is still pending.
Rate limit errors on the free tier
Resend's free tier caps sends at 100 emails per day and 3,000 per month. If you hit this limit, the API returns a 429 Too Many Requests error.
render returns an empty string
This happens when the React Email render function is called in an environment that doesn't support JSX transformation, or when there's a mismatch between the React version and React Email's peer dependency expectations.
Fix: Ensure yourtsconfig.json has "jsx": "react-jsx" and that your Next.js version is 13.4 or later. Running npm install react@latest react-dom@latest to align versions resolves most cases.
Frequently Asked Questions
Can I use Resend to send marketing emails, not just transactional ones?Resend is primarily designed for transactional email — messages triggered by user actions. For bulk marketing campaigns (newsletters, promotional blasts), dedicated platforms like Loops, Buttondown, or ConvertKit are better suited. Resend's terms of service and infrastructure are optimized for transactional volume.
Do I need my own domain to use Resend?No — you can send from onboarding@resend.dev immediately after creating an account. However, for production use you must add and verify your own domain. Emails from Resend's shared domain will be flagged as suspicious by many email clients for any message that looks like it comes from your product.
Resend's free tier (3,000/month) is more generous than SendGrid's (100/day). Resend's paid plans are also simpler and cheaper for most developer use cases. SendGrid has a larger feature set for enterprise scenarios (dedicated IPs, advanced analytics, marketing automation), but for a typical web application Resend's API is cleaner and more affordable.
Can I send attachments with Resend?Yes. The resend.emails.send method accepts an attachments array where each item has a filename and content (base64-encoded string or Buffer). PDFs, images, and other binary files all work — just keep attachment sizes reasonable to avoid triggering spam filters.
Resend handles delivery retries internally once a message is accepted by their API. If your server crashes before the API call completes, the email is not queued on Resend's side. For guaranteed delivery, consider using a background job queue (BullMQ, Inngest, Trigger.dev) to persist the send intent before making the Resend API call.
Add Production-Grade Email to Your App With Amex Technology
Resend makes the initial setup straightforward, but building a truly robust email system requires more: proper bounce handling, unsubscribe flows, email preference management, monitoring for deliverability regressions, and making sure your domain reputation stays clean as your user base grows.
At Amex Technology, we integrate production-grade transactional email into every application we build — from the DNS verification and React Email template system to the webhook infrastructure that handles bounces and complaints automatically.
If you're building a product that needs reliable email, explore our web app development services, see our Portfolio, or reach out via the Contact page.
Related Services
Need help building this?
Our team specializes in exactly this kind of work. Get a free quote and honest assessment within 24 hours.
Start a Project